Showing posts with label gardening tips. Show all posts

Tuesday, May 18, 2021

Gardening Tip: Purchasing Native Shrubs – What Pot Size is Best?


Tips on choosing the optimal pot size for native shrub purchase.

Late Spring and early Fall are good times to plant native shrubs in Western Colorado and parts of the Four Corners states. For more on planting native plants see: https://mothernaturesmontrosegarden.blogspot.com/2020/09/gardening-tip-september-is-planting.html.  Shrubs are often offered in different size options; one-, two-, five- and ten-gallon are common pot sizes. Given the choice, what is the best size to purchase?

It might seem that buying a larger shrub would be the best option. Many landscapers like to use large size trees and shrubs because they ‘look settled’ from the time of planting. You might also surmise that a larger shrub would reach full size more quickly than a smaller version of the same species.  But with native shrubs, the obvious answer is not always the best one.

Consider a ten gallon (or even larger) native shrub or tree. To get to size, the shrub has likely grown in the nursery for at least two years – sometimes much longer.  That means it has gotten used to nursery conditions: optimal sun and water, nice potting soil and judicious doses of fertilizer.  In short, the nursery-grown shrub has lived a nice life - up to now.  

What a shock when that shrub must suddenly cope with the conditions in your garden! Not that your garden isn’t a nice place. But it just isn’t the same as the nursery. The longer a shrub lives in the nursery, the more difficult the adjustment can be.  So, a smaller plant, with less time in the nursery, will likely have an easier time adjusting to your garden.  

Just like with pets, it’s easier to adopt a youngster than the alternative.  Studies done with native shrubs – and our own experience – suggest that a one-gallon shrub has a better chance of survival in the garden. Young plants are simply more adaptable. In fact, after several years, the one-gallon plant will often be healthier – even larger – than a five- or ten-gallon plant planted at the same time.

Another problem with larger size shrubs is that their roots may have become pot-bound (circle around inside the pot because they have nowhere else to grow). The roots of all native plants should be loosened just prior to planting.  But shrubs that are seriously pot-bound often have a harder time growing out into surrounding soil. In fact, some never do at all – and subsequently die from lack of water and nutrients.

In summary, native shrubs and trees in the one-gallon size provide the best compromise between too small and too large – or, put another way, too short or too long in the nursery.  One gallon plants also are less expensive and easier to take home!

_______________________________________________________


We welcome your comments (below).  You can also send your questions to: monaturesmontrosegarden@gmail.com


Thursday, April 15, 2021

Gardening Tip: Spot Watering with Home-made Drip-irrrigation Buckets (‘Homer Buckets’)


Simple, home-made drip-irrigation buckets simplify spot-watering.

We’re heading into a second year of drought in Western Colorado. Droughts can be a challenge when getting new garden plants established. Sometimes we need to supply a little extra water to an individual plant. And that’s where home-made drip-irrigation buckets (we call them ‘Homer Buckets’) come in handy.


Five-gallon bucket with hole


A ‘Homer Bucket’ is simply a 5-gallon plastic utility bucket with a single, small diameter hole drilled near the bottom (see above).  We use a drill with a 3/16 inch drill bit to create the hole – located 1 inch from the bottom of the bucket. You'll need to test a bucket to see if this diameter allows water to seep optimally into your soil. You may need a smaller diameter hole (slow-draining soils), or larger for fast draining soils. The goal is to prevent water from running off, rather than soaking into the soil. We drill the hole in the same position on each bucket, making it easy to position buckets for watering.

To water, simply place the ‘Homer Bucket’ 8-10 inches from the plant, fill the bucket with water, and let the water drain out through the hole (below).  That’s it!  


Watering buckets allow water to seep in, not run off.


There are several advantages to spot watering with ‘Homer Buckets’. First, they allow you to direct the water to precisely where it’s needed. Second, the small hole allows water to drain slowly, so water soaks into the ground, rather than running off.  Third, you are assured that the plant gets a full 5-gallons of water – no more, no less.  This can be especially helpful when children assist with the watering.   And it assures that precious water isn’t wasted!

Fourth, ‘Homer Buckets’ allow you to water areas that are difficult to irrigate using other methods. We’ve even used them for native plant restoration projects.  Fifth, ‘Homer Buckets’ are easy and inexpensive to make.  They may even cost nothing, if you have access to used 5-gallon paint buckets.

Lastly, watering with ‘Homer Buckets’ is easy.  Place the buckets, fill them with a hose, then let the buckets drain for a half-hour or so.  You can efficiently and easily water a number of plants by simply moving the buckets once they’ve drained.  So undemanding!

We hope you’ll consider making some ‘Homer Buckets’ for your own garden.  They really are a fantastic solution for getting water to plants – even in times of drought!


Consider home-made spot-watering buckets for your garden!


_____________________________________________

We welcome your comments (below).  You can also send your questions to: monaturesmontrosegarden@gmail.com


Wednesday, March 17, 2021

Gardening Tip: Pruning Rabbitbrushes


Rabbitbrush shrubs need spring pruning.


Spring is almost here. The weather in Mother Nature’s Montrose Garden fluctuates between the chilly 40’s and pleasantly warm, although most nights hover around freezing. Some of the hardier shrubs are just beginning to leaf out.  One group of native bush Sunflowers – the Rabbitbrushes – are among the first.  And that means it’s time to prune them!

Several species of Rabbitbrush are native to the Four Corners states. We’ll feature a few as Plants of the Month in the coming year.  But in terms of pruning, the rules are pretty much the same.  Rabbitbrushes are pruned in early spring, when they begin to bud out – much like their cousins the Artemisias. And they are pruned quite substantially; also like some of the Artemisias.


Budbreak in Rabbitbush


In the wilds, bush Sunflowers like the Rabbitbrushes provide important winter browse for large animals like deer and elk, as well as smaller mammals (rabbits, ground squirrels, pocket gophers, etc.).  By late winter, plants are often severely eaten down by the wildlife. And, since The Rabbitbrushes and their native ‘pruners’ evolved together, Rabbitbrushes have developed the ability to grow back vigorously each spring.


Begin pruning Rabbitbrush the year after planting.


In fact, many native bush Sunflowers need a good pruning each spring. If they don’t get it, plants become woody, leggy – in short, less attractive than they should be. And pruning needs to begin in the first year after planting to keep a Rabbitbrush shrub full and lush (as they are in the wilds).


Rabbitbrush in early spring. Note green stems and sprouting buds.


Unlike some shrubs, Rabbitbrushes retain the ability to sprout from older wood. As shown above, even branches with a diameter of an inch or so are green; and buds can be seen below the cut.    This means you can prune a Rabbitbrush branch quite hard, as long as you leave at least four buds below the cut. 


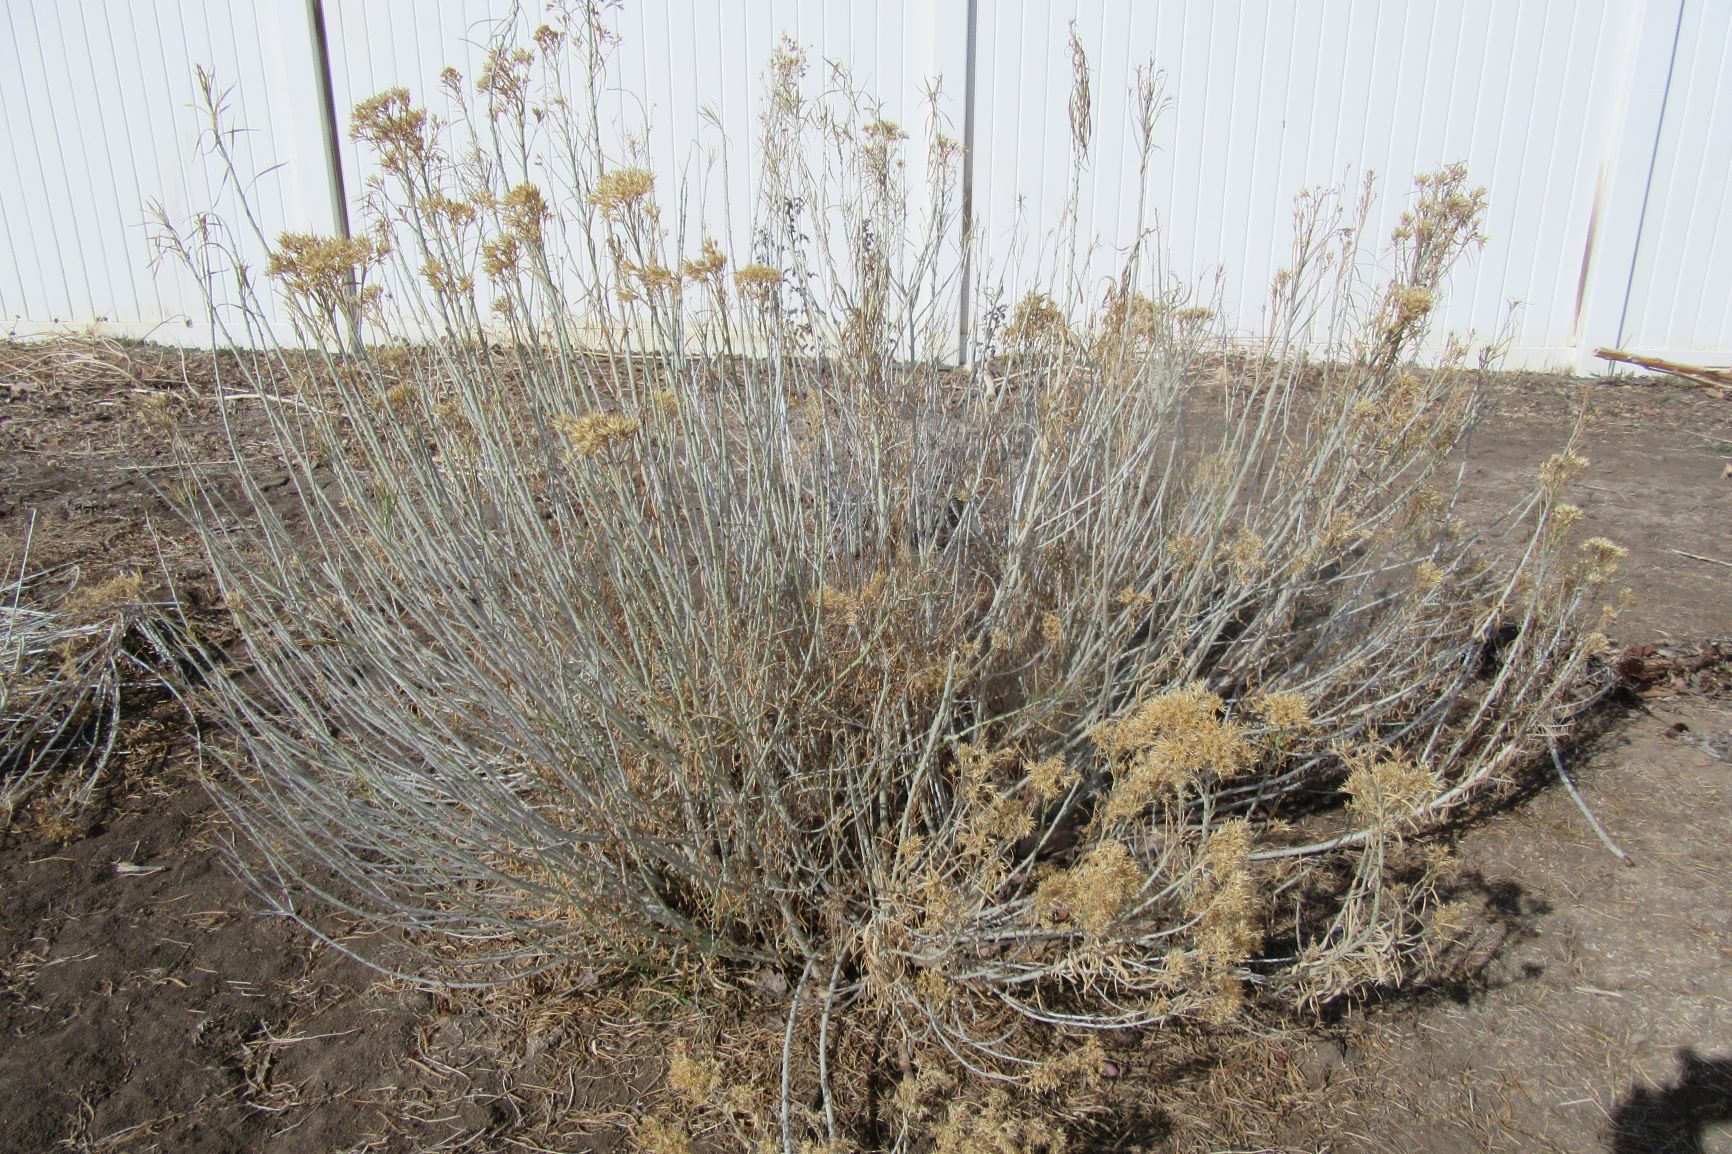
Rabbitbrush before spring pruning.


Above is a Rabbitbrush before pruning.  The shrub was left unpruned over the winter (you can still see remnants of flowers and old leaves).  In colder climates (we’re USDA Zone 6), old growth is left on the plants to protect them from winter chill.


Partially pruned Rabbitbrush.


To give you an idea of our recommended pruning strategy, the picture above shows a plant that is half pruned.  You can see that quite a bit of mass – up to two-thirds of the branch length – can be removed, as long as there are heathy buds beneath.  The photo below shows a fully pruned bush.


Fully pruning Rabbitbrush.


At this point we leave the prunings around the plant to protect it and conserve soil moisture.  When the trimmings are dry, we’ll cut them into smaller pieces and use them as mulch.  And that’s pretty much all there is to say about pruning Rabbitbrushes.


 _________________________________


We welcome your comments (below).  You can also send your questions to: monaturesmontrosegarden@gmail.com


Saturday, January 23, 2021

Gardening Tip: Giving Seeds Their Winter Chill Outdoors


Seeds that require winter chill can be planted out in winter or early spring.

Growing plants from seed has several advantages. It can be an enjoyable hobby, allowing you to appreciate all stages of a plant’s life. It is often less expensive than buying plants.  And for some native species, growing from seed can be the only option.

Seeds of many woody and perennial plants from colder climates need winter chill exposure in order to germinate. The need for chill is usually noted on the seed packet, along with other planting instructions.  Some seeds also benefit from environmental alternations of warmer and colder temperatures.  Giving such seeds a natural exposure in winter or early spring can be a good option.

We like to start our woody trees and shrub seeds in 1-gallon containers.  Those that need winter chill are planted and set out in a sheltered area of the garden in January (above). In our unpredictable climate, we check the pots every few days to be sure they aren’t drying out, watering as required.  That’s really all we do until spring warm up, when pots are moved to our shade structure.


Pots are moved to the shade structure in spring.


 ____________________________


We welcome your comments (below).  You can also send your questions to: monaturesmontrosegarden@gmail.com


Wednesday, October 28, 2020

Gardening Tip: Planting Native Flower Bulbs


Allium unifolium, one of the Western natives recently planted in Mother Nature's Montrose Garden.

Perennials from bulbs are true garden treasures.  The native varieties can be relatively inexpensive, particularly since many reproduce readily from offsets and/or seed.  They add a spot of color in early spring or summer, and can be used to brighten areas of unrelenting green. And they follow a schedule that reminds us of the seasonal cycle, giving us a treat to look forward to, year after year. 

Many Western native bulbs are planted in fall. But you need to get your orders in early (summer is best) to reserve bulbs for fall planting. Bulbs can be ordered on-line from most sources. And bulbs are shipped in time for appropriate planting, usually based on USDA Climate Zone.


Native bulbs can be challenging to find, particularly if you limit yourself to local natives.  But some western bulbs are propagated by native plant growers – some are even available from the larger commercial bulb producers.  For example, K. van Bourgondien, a Dutch bulb grower, offers Camassia quamash (Camas) and a few other western natives.  John Scheepers offers Camas, Allium unifolium and cultivars of several native Brodiaea, in addition to the more traditional garden bulbs.  Easy to Grow Bulbs also offers a collection of N. American species and cultivars.


Smaller Wild Hyacinth plants have naturalized from seed.

Seeds for some bulb-producing perennials are available from on-line native seed sources (see Native Plant and Seed Sources page, right).  Growing bulb perennials from seed takes time; many bulbs take three or more years to reach flowering size.  But seeds may be the only option for some rarer native species. And while requiring patience, growing bulbs from seed can be a fun and inexpensive way to grow such intriguing native species!


Native bulbs can be grown from seed in pots.  Many native bulb
 perennials also make great container plants.


If you live in a cold-winter climate, it’s important to check the USDA Zone before ordering a bulb species.  Many of the loveliest Western natives come from the West Coast.  Not all are hardy in colder climates, so be sure to check. If a species is too  tender, you can usually grow it in a container and overwinter it indoors.  If you’re interested in West Coast species, here are some good sources of bulbs and seeds:

·         Teleos Rare Bulbs (http://telosrarebulbs.com/index.html)

·         Seven Oaks Nursery (https://www.sevenoaksnativenursery.com/)

·         Larner Seeds (https://larnerseeds.com/)

·         Sierra Seed Supply (http://www.sierraseedsupply.com/native_wildflower_seed.html)

·         Seedhunt (http://www.seedhunt.com/california-natives/)


It’s also important to check the growth requirements before ordering bulbs. Many native bulbs like to be relatively dry in summer/fall, but there are exceptions. The summer-dry requirement is another reason to consider growing bulbs in containers. Most native bulbs like full sun, although some do well in part-shade. Most grow best with conditions similar to those in their natural habitat.   So, be sure to order species that will thrive under the conditions available in your garden – or grow them in containers.


Bulb growers ship bulbs at the appropriate time for planting.  In our part of Western Colorado, that time is early to mid-October, when soil temperatures are neither too warm or too cold. Of course, sometimes we can be surprised by an early snowfall (above).  So, it’s best to plant soon after the bulbs arrive.


Lay bulbs out before planting.

Planting bulbs is easy.  The grower usually provides advice on planting density and planting depth. If not, research the planting requirements on-line.   Lay the bulbs out on the ground where you want to plant them (above).  This allows you to visualize their placement, adding or subtracting bulbs as needed.  


Many native bulbs are relatively small (compared to typical tulip or daffodil bulbs). We find it most convenient to plant native bulbs with a pointed garden trowel (above). Dig a small hole, the appropriate depth.  Place the bulb in the hole, root end down.  Cover with dirt and press down firmly with your hand.  That’s it.


Dig a hole just big enough for bulb. Be sure the bulb sits at proper depth.


Like most seasonally-dormant plants, bulb perennials are best marked at the time of planting.  Otherwise you’ll forget their exact location (trust me).  For guidance on how to mark your soon-to-be-dormant perennials, see: https://mothernaturesmontrosegarden.blogspot.com/2019/10/gardening-tip-mark-your-perennials.html.


Label your bulbs right away (so you know where they are located)

And that’s all there is to it.  Relax with your favorite beverage and dream about your spring garden. If you’ve chosen well, the native bulbs should multiply, providing an ever more impressive display over the years.   For more on growing California (and other) native bulbs, see:   http://mother-natures-backyard.blogspot.com/search?q=bulbs.


Native bulbs provide years of enjoyment.


_____________________________________


We welcome your comments (below).  You can also send your questions to: monaturesmontrosegarden@gmail.com


Tuesday, September 29, 2020

Gardening Tip: Naturalizing with Sunflowers and Other Native Wildflowers

Native plants in the Sunflower family naturalize well in gardens.

Many plants in the Sunflower family bloom in summer or fall.  They bring welcome color to the garden and provide food for pollinators and seed-eating birds.  Another nice feature: many of them are easy to grow from seed.  That makes them perfect plants for naturalizing.

The term naturalizing refers to using flowering plants in a way that mimics Mother Nature.  People often speak of ‘naturalizing bulbs’.  But plants that produce viable seeds can also be used to naturalize.  The trick is to spread the seed about the garden in a way that looks natural.  And the best way to do that is to observe how plants group themselves in nature.


In the wild, Sunflowers often cluster in areas with optimal growing conditions.


In the Western U.S., plants in the Sunflower family (Asteraceae) are easy to observe in nature.  In a natural setting, plants often occur in clusters spread across the landscape.  There are often areas between these clusters: places where conditions are poorly suited for the establishment of plants by seeds or runners (rhizomes).


Native Lupines and Phlox form a lovely natural pattern.


The establishment pattern can also indicate wind patterns, since many small seeds are distributed by wind.  This is true of seeds specially adapted to wind distribution (those with feathery ‘parachutes’), as well as seeds that are simply blown along the ground.  And several species of plant are often interspersed, forming interesting patterns (above).

When naturalizing native flowering plants in the garden, you can’t go wrong by following the patterns of nature.  This can be achieved in at least three ways: 1) by letting plants re-seed themselves; 2) by harvesting annual plants (or portions of perennials) and laying them in a desired setting; 3) by collecting seeds and planting them in natural-looking clusters.


When native plants self-seed, the seedlings often cluster near the parent plant.

Letting plants re-seed themselves

This is the easiest method of all.  It also produces a natural-appearing distribution of plants, since the same forces that distribute seeds in the wild are at work in the garden (above).  Self-reseeding works for both annuals and perennials – even plants grown in containers and set out in the garden to re-seed.  The disadvantage of this method is that the process requires time.  To establish plants in several areas of the garden more quickly, you’ll need to give Mother Nature a helping hand.


We call this the 'lazy naturalizer' method. It is a good method
 for naturalizing some plants.


Re-seeding using whole (or portions) of plants

We call this the lazy naturalizer method.  It works for annuals, perennials that need to be culled, or perennials that you cut back after seed is ripe. This method does a good job of producing natural looking plant clusters, in desired areas of the garden.  And it’s often the easiest way to deal with tiny seeds.

Simply wait until seeds are ripe on the plants (pods open, seeds are dry, or birds are starting to eat them).  Harvest entire plants (or cuttings with seed pods/heads) and simply place them on bare ground in the desired spot. The dying plants will look a little untidy during fall (above).  But they provide a protective mulch over winter and will often break down by the following spring. They also protect seeds from seed-scavenging birds (somewhat).

You can stomp on the dried plants - or cut them up into smaller pieces to make them less conspicuous - for fall and winter. In spring, new seedlings will emerge, protected by the natural mulch.  There may be too many seedlings.  You can thin them (or, if you are lazy, just let nature take its course).


Seeds are best dried and stored in paper bags in a cool, dry place.

Collecting and spreading seed

You can also collect the seed and store it until it’s time to plant (more on that next month).  Let seeds dry on the plants.  Harvest the dry seeds and store in paper bags (or glass jars) in a cool, dry place until planting. If seeds grow in papery pods or in a typical sunflower ‘head’, you can harvest entire pods/heads, place them in a paper bag in a cool, dry place (above) and let them fully dry. Seeds can then be more easily separated  and stored.

When planting, remember the lessons of nature. Plant clusters of seeds across the landscape to give a natural appearance. Intersperse seeds of different species to add interest and look more authentic.   And be sure to plant seeds on bare ground or in areas with only a thin inorganic (gravel) mulch.


Success!! A new plant from seed.

We hope you’re inspired to try these suggestions for naturalizing plants by seed. These methods work well for any plants that produce plenty of viable seeds (note: some cultivars to not).  The sunflowers come to mind: sunflowers, goldenrods, cone flowers, asters, rabbit bushes, etc. all naturalize easily.  But wild tobaccos, milkweeds, valerians, four-o’clocks, ranunculus, buckwheats, campanulas and many native grasses, bulbs and wildflowers also naturalize well.

_____________________________________________


We welcome your comments (below).  You can also send your questions to: monaturesmontrosegarden@gmail.com


Tuesday, September 15, 2020

Gardening Tip: September is Planting Month

Fall is a great time for planting native plants

For many Four Corners gardeners, the question of when to plant trees, shrubs and perennials is an important one.  Some advocate planting in spring, when the ground is damp and before temperatures become too hot. But there are also good reasons for planting in the fall, particularly when establishing native plants.  Here at Mother Nature’s Montrose Garden we’ve tried both planting seasons with good success.  But our major planting has always been in the fall.  Here’s why.

First, the late summer/early fall monsoonal rains often soak the ground, making planting and establishment easy.  Fall rains also give the plants a good start; there’s nothing like a good rain to perk up newly planted specimen.

Another advantage is the fall temperatures.  In general, temperatures are moderately warm and the days are still fairly long. Moderate temperatures are optimal for many of our native plants.  In fact, many native perennials have a second growth spurt in the fall. Air and soil temperatures that are neither too hot nor too cold are just right.  And in many areas, the cold weather is still a month or six weeks away, in mid to late October.  That’s often plenty of time for a new plant to prepare for winter.

There’s a third good reason for planting in fall: local native plants are programmed to grow – and particularly to establish their roots – in the fall.  Once again, the plants are adapted to our rhythms of temperature, soil moisture and humidity.  The optimal fall conditions promote growth in general.  As an added bonus, many plants can actually sense the shorter days and cooler night temperatures. This provides added stimulus to put down a good root system. 


Place your plants out to be sure you like the location.


In summary, planting native trees, shrubs and perennials in September works with the patterns of nature to give new plants a good start.  The trick is to plant as early in September as possible – but not when the weather is hot, dry and windy.  That’s why many Four Corners gardeners’ plant in the second or third week of September.

On the topic of planting, here are a few additional tips to increase your success with fall planting of Western native plants:

    • Be sure the ground is moist.  If rains have not moistened the ground, give the whole area a good soaking the day before planting.  
Hole size: slightly bigger than pot size

·         Dig a planting hole that is just a little bit wider and deeper than the pot in which the plant is growing (above). The old ‘wisdom’ of digging a big hole doesn’t work as well for native plants.  The sooner a native plant’s roots can grow into the garden soil the better; a smaller hole accomplishes that.

·         Don’t amend the soil in the planting hole. Amendments are not needed, and may actually discourage good root growth.  Just backfill the bottom of the hole with a little loose soil; that’s all you need to do.

·         If the soil surrounding the hole is dry, fill the hole with water and let it drain before planting.  Once again, this will encourage roots to grow out into the surrounding soil.

Hit sides of pot to loosen plant.

Gently remove plant

·         Remove the plant from the pot gently. Hit the sides and bottom of the pot firmly with your hand to dislodge the plant.  Then turn the pot upside down, and let the plant drop into your hand (above)

Loosen roots with your palm or fingers

·         Loosen the roots by rubbing the root ball with the palm of your hand (above).  Just a gentle rub, all over, to loosen pot-bound roots and stimulate them to grow.

·         Check the depth of the hole. The potting soil surrounding the plant should be level with the ground.  Add or remove soil as needed (below) before placing the plant in the hole.

Pot soil should be level with garden soil.

·         Fill in the planting hole with garden soil.  You’ll have plenty left from digging the hole.  Be sure to fill in the holes all around the plant.

·         Press down soil firmly around the plant.  We often also gently step on the soil to be sure that plant roots are in good contact with the soil.  This step is critical for getting roots to grow into the soil and establish a good root system quickly.

·         If no rain is predicted, water in the plant with a good sprinkling with a hose or watering can.

·         Mark the new plant with a colored flag. You may also want to identify the plant with a permanent marker.  For more see: https://mothernaturesmontrosegarden.blogspot.com/2019/10/gardening-tip-mark-your-perennials.html

·         Take a picture of the new plant for your records.

·         Reward yourself with your favorite beverage!


For a copy you can print see: https://www.slideshare.net/cvadheim/garden-tips-planting-native-plants


 ________________________________


We welcome your comments (below).  You can also send your questions to: monaturesmontrosegarden@gmail.com


Monday, June 15, 2020

Life-Friendly Gardening: Planning for Pollinators


Bees, butterflies, moths and other insects – we see them among the flowers but give them little thought.  In fact, we owe them a huge debt of gratitude.  Without these helpful creatures, our gardens would be devoid of flowers and our tables empty of food.   Insect pollinators – along with a handful of birds and animals - are ‘keystone species’, without which many living ecosystems would collapse.  That's one good reason to celebrate National Pollinator Week!


Flowering plants have a unique challenge – getting the pollen (microsporangium/ male gamete or male sex cell) to the egg (ovule/ female sex cell; located in the plant ovary) where fertilization can occur.  But plants are stationary and ensuring  fertilization is no easy matter.   In fact, most plants need a little help moving the pollen from the anther (where it’s produced) to the stigma (the female organ that receives the pollen).


Some flowering plants – mostly grasses and conifers – are wind-pollinated; the wind simply blows the pollen from an anther to a stigma.  For a very small number of plants, water accomplishes the pollen transfer.   But the vast majority of flowering plants depend on living organisms – living pollinators – to ensure that fertilization occurs. 


Eighty percent of the world’s food crops are pollinated by animal pollinators.  Crops as diverse as apples, cotton, peanuts, soybeans and squash are pollinated by insect pollinators. Without flowering plants our lives would be less colorful, less fragrant – and hungrier.  Imagine a world without 80% of our most common agricultural and garden plants!


Several years ago, beekeepers noticed a decline in the number of European Honeybees used to pollinate crops.  You may have noticed similar declines in your own garden.   ‘Colony Collapse Disorder’, as the Honeybee die-off is called, serves as a wake-up call to all of us.  Pollinators are vital to life on earth – and we all must do our part in keeping them safe. By taking a few simple steps (like providing food, water and places to raise their young), home gardeners can help insure there will always be enough pollinators to provide their unique services.


Who are the Pollinators?

The range of pollinators may surprise you.  Most common are the bees, flies and wasps. Native bee pollinators range in size from large bumblebees to bees hardly visible with the naked eye (over 946 species in Colorado; between 100 and 200 in Montrose County alone) [1]. Flies and wasps pollinate many native, agricultural and garden plants; butterflies and moths are also important.  Many of these pollinators have special adaptations (hairs; pollen sacks) that make them efficient ‘movers of pollen’.   If you observe a native plant in bloom, the majority of the insect visitors will be bees, wasps and flies (though it may be difficult to tell them apart).

Beetles, true bugs, ants and hummingbirds are less common pollinators, but their services are vital for certain types of plants. In our area, hummingbirds play an important role in pollinating the trumpet-flowered species we think of as ‘hummingbird plants’. All pollinators are important; many plants are pollinated by several different pollinators.  This is so in the wild, in agricultural fields and in our gardens.


Why Do Pollinators Visit Flowers? 

The pollinator’s primary foods are pollen and nectar (the sweet syrup made by flowers to attract insects).  Flowers attract pollinators with color, scent and other cues.  The pollen transfer is often unintentional – a consequence of the pollinator coming in contact with flowering parts in the course of feeding on pollen and nectar.  Pollination is actually a by-product of the pollinator’s main task - finding food for themselves and their offspring.   The interaction of pollinators and plants is a good example of a mutualistic relationship because both parties benefit from their interactions.


Can’t Honeybees Take Care of Pollination? 

No – and for several reasons.  First, there are often not enough honeybees to do the job; native pollinators must supplement their services to maintain adequate levels of pollination.   Some native pollinators can even work when it’s too cold, hot or damp for honeybees.  Native pollinators are well-suited to pollinate plants that cannot be pollinated by honeybees – for example, a number of ‘hummingbird plants’ and other plants that need specialist pollinators.  Finally, native pollinators provide an important backup system; if something happens to the honeybees (like Colony Collapse Disorder), other pollinators can take over.   For all these reasons we need to attract a range of pollinators to our gardens.  


Where do Native Pollinators Live? 

The majority of them live in natural places (nature preserves; parks; other natural areas), but native pollinators also live in gardens.  Where ever food plants, water and nest sites occur, pollinators will live.  As natural areas become more scarce, gardens play an increasingly important role in providing pollinator habitat. When you provide pollinator habitat, you help conserve native pollinators – and also benefit from their services.   Your vegetable garden and fruit trees will be more productive as a result of native pollinator visits.


What can I do to Provide Pollinator Habitat?


1.   Choose plants that provide quality pollen & nectar. Just follow these simple principles when choosing plants for your garden: 

§  Choose local native plants when possible.  They have pollen & nectar specifically formulated for our native pollinators.  In addition, local native pollinators love them; 

§  Choose plants with many small blooms.  Often the best have white, pink or yellow flowers; 

§ For non-native plants, choose herbs, stone fruits, apples, citrus, berry bushes, melons/squash – or flower/vegetable plants noted as being ‘open-pollinated’ or ‘heirloom’ varieties.   When choosing bedding plants, visit the nursery on a sunny day and choose the variety that attracts the most pollinators.


§  Choose plants from the following groups:  

o   Sunflower family (Asteraceae)

o   Mint family (Lamiaceae) – mints, sages & many common kitchen herbs like Rosemary, Sage, Thyme, Basil and Lavender.

o   Native Phacelia species

o   Rose family (Rosaceae)

o   Buckwheat family (Polygonaceae)

o   Carrot family (Apiaceae)

o   Buckthorn family (Rhamnaceae) including Ceanothus, Rhamnus, Frangula


§  Strive to have something blooming from spring through fall; 


§  Plan for flowering area of at least 3 ft x 3 ft per species.  In general, the more flowers – the better.  Group flowering plants like perennials. 


§ Choose trees, shrubs, vines/climbers and annual wildflowers to provide pollinator habitat. Vines, hedge shrubs, trees and espaliers  provide many blooms in a small space.  A well-chosen tree or shrub can be an important pollinator habitat plant.  For more ideas see references 2 through 7, below.


2.   Provide nesting sites – only the European Honeybee nests in a hive.  Most native pollinators are solitary and nest either in the ground (need a patch of bare ground) or in holes in dead trees.  You can purchase or build your own bee houses (search ‘bee house’ on the internet). 


3.   Provide a source of water – a damp patch of ground, a bird dripper or saucer of water with gravel will do.  The water must be shallow enough that the pollinators can easily and safely access it. 


4.   Limit use of pesticides – most insecticides kill the good insects (including butterflies and other pollinators) along with the bad.  Consider using Integrated Pest Management (see our brochure on ‘IPM for the Home Garden’). 


5.   Encourage your neighbors to garden for pollinators.  Our small yards make it impossible to provide adequate pollinator habitat; it takes a neighborhood to create a ‘pollinator haven’. 


 ___________________________________


1.       https://www.colorado.edu/cumuseum/sites/default/files/attached-files/the_bees_of_colorado.pdf

2.       https://conps.org/wp-content/uploads/2015/05/Low-Water-Native-Plants-for-Pollinators-brochure-6-8-15.pdf

3.       https://www.pollinator.org/PDFs/Guides/ColoradoPlateaurx3FINAL.pdf

4.       https://www.pollinator.org/pollinator.org/assets/generalFiles/Intermt.SemiDsrt.Desert.rx2_171017_085023.pdf

5.       https://www.pollinator.org/pollinator.org/assets/generalFiles/S.RockyMt.Steppe.rx2_171017_091234.pdf

6.       https://xerces.org/sites/default/files/2018-05/17-054_03_XercesSoc_PollinatorPlants_Southern-Plains-Region_web-3page.pdf

7.       https://www.pollinator.org/PDFs/Guides/Hummingbird_Guide_CO-WY-SD.pdf


 _____________________________________________


We welcome your comments (below).  You can also send your questions to: monaturesmontrosegarden@gmail.com