Wednesday, October 28, 2020

Gardening Tip: Planting Native Flower Bulbs


Allium unifolium, one of the Western natives recently planted in Mother Nature's Montrose Garden.

Perennials from bulbs are true garden treasures.  The native varieties can be relatively inexpensive, particularly since many reproduce readily from offsets and/or seed.  They add a spot of color in early spring or summer, and can be used to brighten areas of unrelenting green. And they follow a schedule that reminds us of the seasonal cycle, giving us a treat to look forward to, year after year. 

Many Western native bulbs are planted in fall. But you need to get your orders in early (summer is best) to reserve bulbs for fall planting. Bulbs can be ordered on-line from most sources. And bulbs are shipped in time for appropriate planting, usually based on USDA Climate Zone.


Native bulbs can be challenging to find, particularly if you limit yourself to local natives.  But some western bulbs are propagated by native plant growers – some are even available from the larger commercial bulb producers.  For example, K. van Bourgondien, a Dutch bulb grower, offers Camassia quamash (Camas) and a few other western natives.  John Scheepers offers Camas, Allium unifolium and cultivars of several native Brodiaea, in addition to the more traditional garden bulbs.  Easy to Grow Bulbs also offers a collection of N. American species and cultivars.
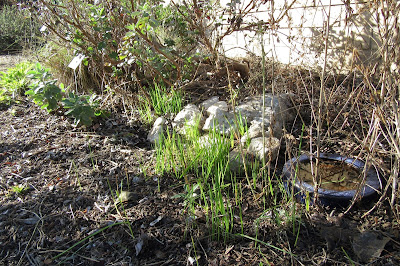

Smaller Wild Hyacinth plants have naturalized from seed.

Seeds for some bulb-producing perennials are available from on-line native seed sources (see Native Plant and Seed Sources page, right).  Growing bulb perennials from seed takes time; many bulbs take three or more years to reach flowering size.  But seeds may be the only option for some rarer native species. And while requiring patience, growing bulbs from seed can be a fun and inexpensive way to grow such intriguing native species!


Native bulbs can be grown from seed in pots.  Many native bulb
 perennials also make great container plants.


If you live in a cold-winter climate, it’s important to check the USDA Zone before ordering a bulb species.  Many of the loveliest Western natives come from the West Coast.  Not all are hardy in colder climates, so be sure to check. If a species is too  tender, you can usually grow it in a container and overwinter it indoors.  If you’re interested in West Coast species, here are some good sources of bulbs and seeds:

·         Teleos Rare Bulbs (http://telosrarebulbs.com/index.html)

·         Seven Oaks Nursery (https://www.sevenoaksnativenursery.com/)

·         Larner Seeds (https://larnerseeds.com/)

·         Sierra Seed Supply (http://www.sierraseedsupply.com/native_wildflower_seed.html)

·         Seedhunt (http://www.seedhunt.com/california-natives/)


It’s also important to check the growth requirements before ordering bulbs. Many native bulbs like to be relatively dry in summer/fall, but there are exceptions. The summer-dry requirement is another reason to consider growing bulbs in containers. Most native bulbs like full sun, although some do well in part-shade. Most grow best with conditions similar to those in their natural habitat.   So, be sure to order species that will thrive under the conditions available in your garden – or grow them in containers.


Bulb growers ship bulbs at the appropriate time for planting.  In our part of Western Colorado, that time is early to mid-October, when soil temperatures are neither too warm or too cold. Of course, sometimes we can be surprised by an early snowfall (above).  So, it’s best to plant soon after the bulbs arrive.


Lay bulbs out before planting.

Planting bulbs is easy.  The grower usually provides advice on planting density and planting depth. If not, research the planting requirements on-line.   Lay the bulbs out on the ground where you want to plant them (above).  This allows you to visualize their placement, adding or subtracting bulbs as needed.  


Many native bulbs are relatively small (compared to typical tulip or daffodil bulbs). We find it most convenient to plant native bulbs with a pointed garden trowel (above). Dig a small hole, the appropriate depth.  Place the bulb in the hole, root end down.  Cover with dirt and press down firmly with your hand.  That’s it.


Dig a hole just big enough for bulb. Be sure the bulb sits at proper depth.


Like most seasonally-dormant plants, bulb perennials are best marked at the time of planting.  Otherwise you’ll forget their exact location (trust me).  For guidance on how to mark your soon-to-be-dormant perennials, see: https://mothernaturesmontrosegarden.blogspot.com/2019/10/gardening-tip-mark-your-perennials.html.


Label your bulbs right away (so you know where they are located)

And that’s all there is to it.  Relax with your favorite beverage and dream about your spring garden. If you’ve chosen well, the native bulbs should multiply, providing an ever more impressive display over the years.   For more on growing California (and other) native bulbs, see:   http://mother-natures-backyard.blogspot.com/search?q=bulbs.


Native bulbs provide years of enjoyment.


_____________________________________


We welcome your comments (below).  You can also send your questions to: monaturesmontrosegarden@gmail.com


Tuesday, October 20, 2020

Creating Your Colorado-friendly Garden: 7.c – Creating an Irrigation Plan for Mother Nature’s Montrose Garden


This post is part of the series Creating Your Colorado-friendly Garden. For links to all posts in this series see the Colorado-friendly Gardening page (right).


In August we discussed how to design a garden irrigation plan (https://mothernaturesmontrosegarden.blogspot.com/2020/08/creating-your-colorado-friendly-garden.html).  In our example, we modified an existing irrigation system to make it more water-wise. Our example was typical of a smaller, in-town or suburban garden. It showed how irrigation systems can be used in conjunction with Water Zone gardening to create a more interesting and efficient garden. But perhaps you’re faced with a larger, pre-existing irrigation challenge – more like our irrigation system challenge in Mother Nature’s Montrose Garden.  


As a first step, we studied the existing wet and dry patterns in the garden (above). We were surprised at the variability in soil moisture.  Several dry areas were due to sandier soil that drained very quickly compared to the clay-loam in the rest of the garden. Still other dry areas were due to poor coverage by the existing irrigation system (even after multiple attempts improve coverage).   Several wetter areas were due to the slope of the property (lower to the east) or to shade patterns. 

The soil moisture patterns suggested options for creating a more water-efficient garden.  They also hinted at interesting possibilities hidden in the garden’s existing conditions.  The naturally well-drained areas could be planted with native species requiring very well-drained soils. That was good news, as several are among our favorites!  Conversely, the moister areas could be used for plants that need a little extra water.  

We considered these patterns when designing a Water Zone Plan for the garden, below. Our overall goal was to decrease water use overall, while retaining flexibility for the future.  For more on Water Zone Gardening see: https://mothernaturesmontrosegarden.blogspot.com/2020/07/creating-your-colorado-friendly-garden.html  


As seen in our Water Zone Map, we plan to retain the front yard lawn – at least for the present. That area will require regular water. So will an apron of lawn around the house in the backyard.  But we are in the process of implementing our new garden design; one that will be more interesting and water-wise than the pre-existing landscape (almost all turf lawn). The real question is whether we can adapt the current irrigation system, designed to water lawns, to meet the requirements of our Water Zone Plan!


Station/Zone 1 [blue]; Station 2 [green]; Station 3 [gold]; Station 4 [orange.
Stars indicate approximate position of sprinkler heads


The photo above (not to scale) shows the current irrigation system, as designed and modified over the years.  The plan’s a bit confusing, but stay with us.  The existing system, which irrigates the 1 acre property, consists of 6 stations/zones: Station/Zone 1 (around the house + western front yard); Station 2 (eastern front yard + part of eastern backyard); Station 3 (western backyard); Station 4 (rest of eastern backyard); Station 5 (fills the pond); Station 6 (shade structure located next to shed in NE corner of backyard).  The system consists of a number of pop-up, oscillating (Rainbird-type) sprinkler heads, typical for larger yards in Western Colorado.  

The existing system seems to have been modified as the landscaping progressed.  So, some aspects of the system are perplexing.  But there are several fortunate aspects to the design.  First, the front yard and the area around the house are all on two Stations (1 and 2).  Since we plan to keep these areas in turf grass, they will require more water than other parts of the yard. It’s fortunate that they can all be watered with two irrigation Stations/zones (1 and 2). 

But a quick look at the Water Zone Map (above), as well as personal experience, suggests that a few modifications are needed, even to these Irrigation Stations. For example, several sprinkler heads in Stations 1 and 2 irrigate the backyard, just inside the southeast fence.   These areas require deep, weekly watering (Water Zone 3) rather than regular water.   If unmodified, they will get more water than they need for optimal health.

A quick glance at the Water Zone Map suggests that Stations 3 and 4 will also need to be modified to accommodate different water needs. The large shrubs inside the backyard fence are Water Zone 1-2 (monthly deep water).  This watering schedule will be difficult to accomplish with the existing sprinkler heads. In addition, we need to plan for the future: 1) many of the natives will require less water as they become established; 2) climatic cycles of precipitation and drought may change in the future. 

All of the above suggest the need to plan for more flexibility in the system.   One easy way is to convert some of the sprinkler heads to irrigation risers with spigots (hose bibs).   These will allow us to connect hoses, sprinklers and soaker hoses for  spot-watering, as needed.  Many of the sprinkler heads around the edges of the garden are perfectly suited for this type of conversion.   A modified Irrigation Plan, with the risers/hose bib shown as triangles, is shown below.


Stars indicate sprinkler heads; triangles indicate risers with hose bibs (spigots)


The final issue is to develop an irrigation scheme for the proposed raised-bed vegetable garden.  Fortunately, it will be easy to modify Irrigation Station/Zone 6 to accomplish this. We’ll discuss the details next month, when we consider other aspects of hardscape.  In the meantime, we can take a well-deserved break and admire our final Irrigation Plan (below).


Station/Zone 6 [purple] will irrigate planned vegetable garden


______________________________________ 


We welcome your comments (below).  You can also send your questions to: monaturesmontrosegarden@gmail.com