Tuesday, September 29, 2020

Gardening Tip: Naturalizing with Sunflowers and Other Native Wildflowers

Native plants in the Sunflower family naturalize well in gardens.

Many plants in the Sunflower family bloom in summer or fall.  They bring welcome color to the garden and provide food for pollinators and seed-eating birds.  Another nice feature: many of them are easy to grow from seed.  That makes them perfect plants for naturalizing.

The term naturalizing refers to using flowering plants in a way that mimics Mother Nature.  People often speak of ‘naturalizing bulbs’.  But plants that produce viable seeds can also be used to naturalize.  The trick is to spread the seed about the garden in a way that looks natural.  And the best way to do that is to observe how plants group themselves in nature.


In the wild, Sunflowers often cluster in areas with optimal growing conditions.


In the Western U.S., plants in the Sunflower family (Asteraceae) are easy to observe in nature.  In a natural setting, plants often occur in clusters spread across the landscape.  There are often areas between these clusters: places where conditions are poorly suited for the establishment of plants by seeds or runners (rhizomes).


Native Lupines and Phlox form a lovely natural pattern.


The establishment pattern can also indicate wind patterns, since many small seeds are distributed by wind.  This is true of seeds specially adapted to wind distribution (those with feathery ‘parachutes’), as well as seeds that are simply blown along the ground.  And several species of plant are often interspersed, forming interesting patterns (above).

When naturalizing native flowering plants in the garden, you can’t go wrong by following the patterns of nature.  This can be achieved in at least three ways: 1) by letting plants re-seed themselves; 2) by harvesting annual plants (or portions of perennials) and laying them in a desired setting; 3) by collecting seeds and planting them in natural-looking clusters.


When native plants self-seed, the seedlings often cluster near the parent plant.

Letting plants re-seed themselves

This is the easiest method of all.  It also produces a natural-appearing distribution of plants, since the same forces that distribute seeds in the wild are at work in the garden (above).  Self-reseeding works for both annuals and perennials – even plants grown in containers and set out in the garden to re-seed.  The disadvantage of this method is that the process requires time.  To establish plants in several areas of the garden more quickly, you’ll need to give Mother Nature a helping hand.
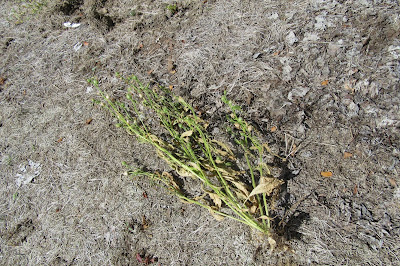

We call this the 'lazy naturalizer' method. It is a good method
 for naturalizing some plants.


Re-seeding using whole (or portions) of plants

We call this the lazy naturalizer method.  It works for annuals, perennials that need to be culled, or perennials that you cut back after seed is ripe. This method does a good job of producing natural looking plant clusters, in desired areas of the garden.  And it’s often the easiest way to deal with tiny seeds.

Simply wait until seeds are ripe on the plants (pods open, seeds are dry, or birds are starting to eat them).  Harvest entire plants (or cuttings with seed pods/heads) and simply place them on bare ground in the desired spot. The dying plants will look a little untidy during fall (above).  But they provide a protective mulch over winter and will often break down by the following spring. They also protect seeds from seed-scavenging birds (somewhat).

You can stomp on the dried plants - or cut them up into smaller pieces to make them less conspicuous - for fall and winter. In spring, new seedlings will emerge, protected by the natural mulch.  There may be too many seedlings.  You can thin them (or, if you are lazy, just let nature take its course).


Seeds are best dried and stored in paper bags in a cool, dry place.

Collecting and spreading seed

You can also collect the seed and store it until it’s time to plant (more on that next month).  Let seeds dry on the plants.  Harvest the dry seeds and store in paper bags (or glass jars) in a cool, dry place until planting. If seeds grow in papery pods or in a typical sunflower ‘head’, you can harvest entire pods/heads, place them in a paper bag in a cool, dry place (above) and let them fully dry. Seeds can then be more easily separated  and stored.

When planting, remember the lessons of nature. Plant clusters of seeds across the landscape to give a natural appearance. Intersperse seeds of different species to add interest and look more authentic.   And be sure to plant seeds on bare ground or in areas with only a thin inorganic (gravel) mulch.


Success!! A new plant from seed.

We hope you’re inspired to try these suggestions for naturalizing plants by seed. These methods work well for any plants that produce plenty of viable seeds (note: some cultivars to not).  The sunflowers come to mind: sunflowers, goldenrods, cone flowers, asters, rabbit bushes, etc. all naturalize easily.  But wild tobaccos, milkweeds, valerians, four-o’clocks, ranunculus, buckwheats, campanulas and many native grasses, bulbs and wildflowers also naturalize well.

_____________________________________________


We welcome your comments (below).  You can also send your questions to: monaturesmontrosegarden@gmail.com


Tuesday, September 15, 2020

Gardening Tip: September is Planting Month

Fall is a great time for planting native plants

For many Four Corners gardeners, the question of when to plant trees, shrubs and perennials is an important one.  Some advocate planting in spring, when the ground is damp and before temperatures become too hot. But there are also good reasons for planting in the fall, particularly when establishing native plants.  Here at Mother Nature’s Montrose Garden we’ve tried both planting seasons with good success.  But our major planting has always been in the fall.  Here’s why.

First, the late summer/early fall monsoonal rains often soak the ground, making planting and establishment easy.  Fall rains also give the plants a good start; there’s nothing like a good rain to perk up newly planted specimen.

Another advantage is the fall temperatures.  In general, temperatures are moderately warm and the days are still fairly long. Moderate temperatures are optimal for many of our native plants.  In fact, many native perennials have a second growth spurt in the fall. Air and soil temperatures that are neither too hot nor too cold are just right.  And in many areas, the cold weather is still a month or six weeks away, in mid to late October.  That’s often plenty of time for a new plant to prepare for winter.

There’s a third good reason for planting in fall: local native plants are programmed to grow – and particularly to establish their roots – in the fall.  Once again, the plants are adapted to our rhythms of temperature, soil moisture and humidity.  The optimal fall conditions promote growth in general.  As an added bonus, many plants can actually sense the shorter days and cooler night temperatures. This provides added stimulus to put down a good root system. 


Place your plants out to be sure you like the location.


In summary, planting native trees, shrubs and perennials in September works with the patterns of nature to give new plants a good start.  The trick is to plant as early in September as possible – but not when the weather is hot, dry and windy.  That’s why many Four Corners gardeners’ plant in the second or third week of September.

On the topic of planting, here are a few additional tips to increase your success with fall planting of Western native plants:

    • Be sure the ground is moist.  If rains have not moistened the ground, give the whole area a good soaking the day before planting.  
Hole size: slightly bigger than pot size

·         Dig a planting hole that is just a little bit wider and deeper than the pot in which the plant is growing (above). The old ‘wisdom’ of digging a big hole doesn’t work as well for native plants.  The sooner a native plant’s roots can grow into the garden soil the better; a smaller hole accomplishes that.

·         Don’t amend the soil in the planting hole. Amendments are not needed, and may actually discourage good root growth.  Just backfill the bottom of the hole with a little loose soil; that’s all you need to do.

·         If the soil surrounding the hole is dry, fill the hole with water and let it drain before planting.  Once again, this will encourage roots to grow out into the surrounding soil.

Hit sides of pot to loosen plant.

Gently remove plant

·         Remove the plant from the pot gently. Hit the sides and bottom of the pot firmly with your hand to dislodge the plant.  Then turn the pot upside down, and let the plant drop into your hand (above)

Loosen roots with your palm or fingers

·         Loosen the roots by rubbing the root ball with the palm of your hand (above).  Just a gentle rub, all over, to loosen pot-bound roots and stimulate them to grow.

·         Check the depth of the hole. The potting soil surrounding the plant should be level with the ground.  Add or remove soil as needed (below) before placing the plant in the hole.

Pot soil should be level with garden soil.

·         Fill in the planting hole with garden soil.  You’ll have plenty left from digging the hole.  Be sure to fill in the holes all around the plant.

·         Press down soil firmly around the plant.  We often also gently step on the soil to be sure that plant roots are in good contact with the soil.  This step is critical for getting roots to grow into the soil and establish a good root system quickly.

·         If no rain is predicted, water in the plant with a good sprinkling with a hose or watering can.

·         Mark the new plant with a colored flag. You may also want to identify the plant with a permanent marker.  For more see: https://mothernaturesmontrosegarden.blogspot.com/2019/10/gardening-tip-mark-your-perennials.html

·         Take a picture of the new plant for your records.

·         Reward yourself with your favorite beverage!


For a copy you can print see: https://www.slideshare.net/cvadheim/garden-tips-planting-native-plants


 ________________________________


We welcome your comments (below).  You can also send your questions to: monaturesmontrosegarden@gmail.com


Saturday, September 5, 2020

Plant of the Month (September) : Hummingbird Trumpet/ California Fuschia – Epilobium canum


Hummingbirds are the jewels of Western gardens.  With their brilliant colors and fascinating behavior, they bring hours of enjoyment.  That’s why many of us include ‘hummingbird plants’ in our garden palette. One such plant, which graces fall gardens with its orange flowers, is the Hummingbird trumpet, Epilobium canum.  The scientific name is pronounced epi-LOBE-ee-um  CAN-um.

Epilobium canum is a member of the Onagraceae (Willow-herb) family that includes such garden favorites as the common garden fuschia, evening primroses, Clarkias, Gauras and native Camassonia species.  The genus Epilobium includes the lovely native Fireweeds as well as California Fuschia.   The taxonomy (classification) of the Willow-herb family is still being sorted out – so we may need to update this post in the future.  Long-time native plant enthusiasts still sometimes call Epilobium canum by its older – but more interesting – name: Zauschneria californica.    The name Zauschneria honored the 18th century German botanist Johann Baptista Josef Zauschner.    The name Epilobium refers to the fact that flower and seedpod occur together and the species name canum refers to the ‘hairy’ aspect of this species.

Epilobium canum is a plant of the North American West, growing from Oregon and Wyoming to Baja California and Northern Mexico.   There are currently four recognized sub-species (note: some taxonomists group ssp. garrettii and latifolium together): Epilobium canum ssp. canum (California Fuschia); E. canum ssp. garrettii (Garrett’s Hummingbird Trumpet); E. canum ssp. latifolium (Mountain Hummmingbird Trumpet); E. canum ssp. angustifolium (Narrowleaf Hummingbird Trumpet).


Sub-species canum and angustifolium are endemic to California. Sub-species garrettii grows on dry rocky slopes and chaparral, up to 5500 ft. elevation, in CA, WY, ID, UT and AZ.
Sub-species latifolium, including the formerly known Epilobium/ Zauchneria arizonica, is found on rocky slopes and canyons, primarily at the highest elevations, 7000-10000 ft., but sometimes as low as 3500 ft. in CA, AZ, s.w. NM & adjacent Mexico. [1]   

As you might expect, sub-species and cultivars vary in their hardiness, as well as their heat and drought tolerance.  If you live where winter temperatures dip to zero degrees F. (or below), sub-species garrettii (USDA Zones 3–10) and latifolium (Zones 5-9) and some of their cultivars offer your best choices.  As always, be sure to check the USDA Zone for a plant before you purchase.  If you live in a warm-winter area, you can grow most of the sub-species and cultivars, but some may require more water.


In the garden, Hummingbird trumpet adds a spot of bright color at a time when the many summer-blooming species are past their prime.   This species really begins growing in earnest in late spring/summer.  In colder climates, the plant dies back significantly – and is also eaten by hungry critters - in winter.  In mild winter areas, gardeners cut the stems back after blooming to achieve the same ends.    The plants start sending up new stems in spring – and really achieve their full growth in summer. 


Hummingbird trumpet is a spreader, so don’t be surprised if a clump of Epilobium increases in size over the years.  The stems of Epilobium canum are slender, part-woody and wand-like to almost vine-like.  They usually form a mounded clump, but it may fill in around other plants.  The leaves are long and narrow or lance-shaped.  The foliage color varies from a medium green, through pale blue-green to silvery.  In fact, the natural variation in foliage color is the source of several common horticultural cultivars.


Hummingbird trumpet’s flowers are spectacular.  They are 1-2 inches long and up to an inch wide.  They range in color from orange to almost scarlet red and are tubular or funnel-shaped. Some cultivars are even a pale orange! The anthers (male flower parts that produce the pollen) as well as the female parts extend well beyond the fused petals.   When a hummingbird reaches into the flower tube to sip nectar, pollen sticks to its head. The pollen is then deposited on the stigma of subsequent flowers.


The flower color, shape and location of the sexual organs are all good clues that Hummingbird trumpet is pollinated by hummingbirds.   Hummingbirds are attracted like a magnet to these glorious flowers.   Locate Epilobium near a seating area and you can observe hummingbirds from a distance of only a few feet!   It’s fun to watch hummingbirds chase others from ‘their’ flowers!


Epilobium canum is easy to grow in western gardens.  It can take just about any local soil – even those with pH around 8.0.   Depending on the sub-species/cultivar it does well in full sun or part-shade.  In full sun the form of the straight species will often be a 2-3 ft. mound; in part-shade the stems create a low ground-cover (see below).   As with common garden fuschias, you can pinch the tips of growing stems to form a fuller plant.


Epilobium canum adapts well to garden conditions.  Species from lower elevations are quite drought tolerant, but look better with infrequent summer water (Water Zone 2; see https://mothernaturesmontrosegarden.blogspot.com/2020/07/creating-your-colorado-friendly-garden.html). Sub-species from higher elevations do best with occasional summer water (Water Zone 3).    Plants can take winter flooding, which is useful for those of us who garden in clay soils.   And in our experience, Epilobium is quite disease- and pest-free.


Yearly maintenance is minimal.  In warm winter areas, cut the branches back to 1-2 inches after flowering to keep the plant looking tidy and healthy. In colder areas, leave the branches on over winter, then cut back in spring.  You can use your cuttings to produce new plants if desired.   You can also let the plants naturalize by seed.  The seeds have fluffy wings (see above) that float on the wind and re-seed throughout the garden.   The natural look is lovely – but the choice is yours.


Epilobium canum can be used in many ways in the garden. It makes a nice fall accent plant in mixed water-wise beds.   We like it mixed with other native shrubs, where it fills in the bare spaces over time.   Hummingbird trumpet can be used as a groundcover – alone or with other native groundcover plants. It will even do spectacularly in a large container.  It’s a perfect accent along walkways or bordering a seating area.  It naturalizes in favorable spots throughout the garden if you let it go to seed.


There are several horticultural cultivars (types selected for garden use) that are readily available at native plant nurseries and sales. In cold-winter areas, try cultivars of subspecies latifolium and garrettii.

Epilobium canum ssp. latifolium   

‘Northfork Coral’ – USDA Zones 5-10, with coral colored flowers. 1-2 ft tall, 2-3 ft wide.

‘Woody's Peach Surprise’ – USDA Zones 5-9. Low-growing form: 6-8” tall by 18” wide. Has unique, pale peach flowers.

Epilobium (Zauchneria) canum [var. arizonica] 'Sky Island Orange' – USDA Zones 5-8. Grows 2-3 ft tall & wide. Flowers red-orange. Wide drought tolerance (10-30” water per year).

Epilobium canum ssp. garrettii

'Orange Carpet' – Hardy (from Idaho; USDA Zones 5-9). Lower-growing  4 to 12 inches high, 2-4 feet wide. Does best with afternoon shade in hot gardens

Another choice for hot summers is Epilobium ‘Everett’s Choice’, from the California Bay Area, which can take the heat. One of the lowest growing of the Epilobiums (3 to 6 inches high, 3 foot spread or more). It’s very drought and deer resistant, and more cold resistant than most California forms (hardy to -10°F).

Because Hummingbird trumpet is a popular garden plant, new cultivars are being introduced all the time.  We suggest that you purchase cultivars in the fall, when you can observe the flowers and foliage colors at their best.

We hope you’ve been inspired by this lovely Western native plant. Most gardens have a spot for one or more of these charming plants.  You’ll love the bright accent in your late summer/fall garden.  It’s a real treasure - unless you detest the color orange!


For a gardening information sheet see: https://www.slideshare.net/cvadheim/gardening-sheet-epilobium-canum-238401468

For more pictures of this plant see: https://www.slideshare.net/cvadheim/epilobium-canum-garden-photos

For plant information sheets on other native plants see:


________

1.       https://plants.usda.gov/plantguide/pdf/pg_epca3.pdf


_________________________________


We welcome your comments (below).  You can also send your questions to: monaturesmontrosegarden@gmail.com